
Northshore Yachts had decided, in the layout of the Vancouver 28, to provide a wide quarter-berth as a 'cosy double' for use in port. We tried it, but they had also upholstered this in rain- and splash-proof vinyl and built the electricity distribution panel over one-third of it. We got sweaty and banged our heads a lot... There was a table thumb-screwed to the floor in the space between the two saloon sea-berths. Nowhere on the boat is there a space big enough to stow this table if you move it... These were problems waiting for a solution.
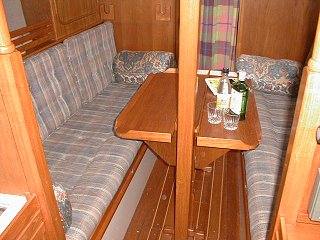 |
| The main saloon, showing the table and the excellent single bunks, very useful at sea, especially with lee-cloths deployed. Note the complete lack of a double bunk or any apparent chance of one... |
It's when faced with a set of problems like this that you need a lucky break. I discovered that the distance between the bunks was almost exactly one-sixth of the length of each bunk. The height of the cave lockers behind each bunk was less than one-sixth of the length of the bunks. Those cave lockers had been worrying me. They had some heavy items stowed in them at times. They needed secure covers on them for safety in case of a knock-down at sea. If only I could get rid of that table, there was a chance that I could work all this out.
Six cave-locker fronts, three each side, could be made from strong marine ply. If they were just the correct length, when in port they could double as slats across the space between the bunks. This would give us not just a double but more like a triple bunk as well as covers for the caves when at sea.
The table had to go. Perhaps we could learn to live without it and just leave it ashore. One afternoon we took it up into the cockpit and with helpful advice from Helen, our woodworking friend, had a very good look at it and its construction. Another cunning plan began to take shape and suddenly it looked as if we had a feasible, if rather complex, project on our hands.
 |
 |
 |
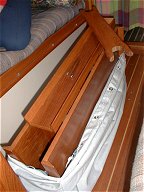 |
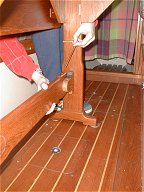
| Jig-saw-puzzle-shaped cuts in both ends of the table's stretcher bar were lined with home-made teak veneer to replace the wood removed by the coping saw blade. Holes drilled vertically through these new joints allow brass dowels to hold the table firmly back together. Good quality brass hinges re-joined both the table legs after I cut them in half. We had Island Yachts, our local sail-maker, sew us a stout acryllic bag to hold it all when folded. This bag doubles as a loose cover when the table is fitted out in the cockpit. | |||
Very careful measurements and even some calculations were necessary before beginning to cut the legs off the table. The cross-member between the legs needed the centre section cutting right out, using curved cuts rather like those that hold a jig-saw puzzle together. The best quality brass hinges I could buy put the legs back together. Lengths of 6 mm brass rod with dome-nuts threaded onto one end act as metal dowels to hold the stretcher, or cross-member, back together. I cut, planed and sanded slivers of teak veneer to just the correct thickness to replace the wood removed by the coping saw blade when the stretcher was cut. This had to be steamed and glued around the curves and also hides the end-grain. Black felt-tip pen marks on one end of the job ensure that we can find which way round to re-insert the stretcher when assembling the table. The folded table now lives in a grey acryllic bag. It can fit anywhere in the forepeak but often is found pushed deep into the quarter berth. You can see a photo of it in this place on the radio page of this web-site, under the short-wave SSB transceiver.
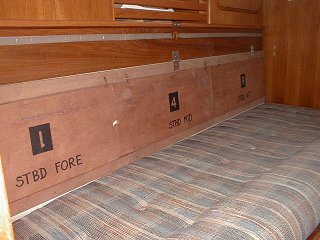 |
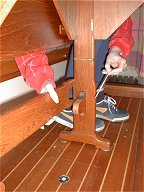
| Good quality 12 mm marine ply covers the cave lockers but, when required, also spans the gap between the settees. |
The gap between the settee berths tapers slightly towards the bow. Each slat has to be a different length and each one has to have angled ends. I calculated that there was only one combination or arrangement that would fit three on each side over the caves and this involves fitting the ends together by inverting every other slat when stowed.
I bought a sheet of the best quality 'Aqua-Marine' 12 mm ply just big enough for the whole job. After splitting it length-wise in half on Helen's circular saw table, I set the blade to an angle of 45° to the table and separated off a top and bottom strip from each half. The slats will then sit between the 45° edges and only need holding in, and down, with brass turn-buckles at the top. With the table saw set back to the normal right angle, it was then a case of carefully cutting the angled ends of each slat.
All the edges were sanded smooth and the corners slightly rounded but no extra finish was applied so that the wood could breath and also would not mark the varnished rails when deployed.
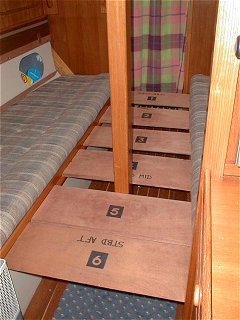 |
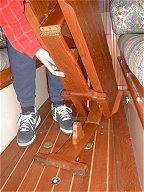
| The slats make a good, strong base for the central section of our new, double (or triple!) bunk |
A 1" x 1" (25 mm x 25 mm) teak rail was cut and radiused then fitted along the front of each settee. The height of this I arranged so that the top of the slats would be just level with the hard surface below the settee cushions. Once they were fitted, these rails were fully finished with four coats of gloss then one of matt varnish to match the rest of the interior.
The slats needed some adjustment with a plane and rasp to get them to each fit in both their roles, but this was soon done on board. I numbered them neatly by buying self-adhesive plastic numbers from a chandlery, sticking them on and then taping a square aound each digit. With a large, black felt-tip pen I coloured the wood within each square then peeled off the tape and the plastic numbers, leaving permanent numbers stained in 'negative' onto the wood.
Each slat also needed labelling with its correct position (and orientation) for covering the cave-lockers. I just wrote this on each one free-hand with the felt pen. The brass turn-buckles were through-bolted with 4 mm stainless steel bolts, not forgetting their role in keeping heavy items secure in case of a knock-down.
Slats 5 and 6, aft of the mast post, took up all the available space there and so could not move. This was not the case for slats 1 to 4, however, so I found some short 6 mm stainless bolts which had a neat, round head, designed to be tightened with an allen key. These threaded into 5 mm holes drilled in the rails and notches cut in the end of each slat locate everything firmly in place.
 |
| Our very comfortable double bunk, ready for bed. It's only for use in port or at anchor, but that's actually most of the time when cruising and living aboard. |
We make the centre of the bunk up with foam cushions from the settee backs or from the quarter berth. The heads door had to go, we've replaced it with a heavy curtain. I was going to separate it, stable-door style, into two but this suits us better anyway. The actual bed is made up with normal duvets and pillows like at home. There's plenty of time for sleeping-bags when at sea or when camping ashore.
The slats are perfectly strong enough - you can walk down the middle of the bed. The set-up has passed every other test we've been able to put it through as well... So we're happy.
